Okay! So! I was going through some things today and stumbled across this post and thought....well. I could blog again.
And since this was all queued up and ready to go......
A pie recipe from a few years ago! (any pictures would surely have been in whatever computer I was using at that time, but as I don't even live in the same country anymore, they are lost.
---------
Look, as far as I'm concerned, Pi Day (March 14, 'cause 3.14, get it?) is a delicious and fantastic holiday. I also am not pleased with my malfunctioning oven. It doesn't really do things like "hold heat" or anything, although it does broil, which is better than nothing. I've made shortbread cookies with that broiler.
I would do fantastically at one of those weird Top Chef challenges where they make you do things in a Target store or in a foil pit or something. But this isn't about my excellent and useful skill set, this is about pie.
I wanted to celebrate Pi Day. I wanted pie. I like pie. So I poked around on-line and, on the Bon Appetit website, I found exactly the recipe I wanted.
No Bake Chocolate-Raspberry Cream Pie. It was easy! In fact, the hardest part was finding the creme fraiche at the grocery store. Also, in finding chocolate wafers that are corn-free, but I was at Jewel and knew it would be a challenge - luckily Annie's to the rescue! Chocolate graham crackers shaped like bunnies! How could I lose? (I could not.) I barely altered the recipe, the pure unadulterated version of which can be found here.
Ingredients:
- seven ounces of chocolate-graham cookies
- 1/2 cup semi-sweet chocolate chips
- six tablespoons unsalted butter, cut into bits
- 1/4 cup sugar
- one tin of 14-oz sweetened condensed milk
- 1/4 cup fresh lemon juice
- the zest of one lemon
- 1/4 cup creme fraiche
- two 6 oz containers of raspberries (2 1/2 cups)
Now, here are the absurdly easy directions.
First, lightly grease your pie plate. I had more crust left over at the end, so I used mini tart tins to make two small pies. Nom. Do as you will.
Now. Bash up the cookies. Then pulverize the bashed up cookies in a food processor or, as I did, in your knock-off magic bullet. When you've got all of it turned into a fine dust, put it in a bowl and set aside.
Now, in a microwave safe bowl put the chocolate chips, the butter, and the sugar. Then, slowly in bursts, melt the mixture - stir repeatedly until it blends together. Pour this into the blended up cookies and stir it up. Once combined, lightly press the crust into the pie pan and then put it in the freezer while you work on the rest of the pie. This is so it sets.
Now, in a mixing bowl, mix together the grated lemon peel, the lemon juice, the creme fraiche, and the sweetened condensed milk until combined. Add in the raspberries and stir, being sure to smoosh them up with a spoon so that the pie filling is pink and the berries are in bits.
The original recipe has you use half the raspberries in the filling and then you scatter the rest over the pie. Feel free to do this.
Now, remove the pie crust from the freezer (I had in there about a half hour or so , because I am easily distracted) and pour in the filling. You'll want it to set properly, which is a suggested time of two hour. Mine was still a bit runny after that time (although delicious), so I let it go overnight. But maybe pop it in the freezer to speed it up. Or, of course, just a few hours are needed. I'm not sure.
Either way, this is delicious. The lemon gives it a wonderful ZING.
15.3.11
Balsamic-Roasted Red Pepper Sauce with Shrimp and Chicken

The aforementioned balsamic-roasted red pepper sauce with chicken and shrimp,
garlic couscous, and a spinach salad with a cranberry-balsamic vinaigrette.
In January, I was given a free ticket to go visit my fantastic friend Michael in St. Paul, Minnesota. I've never been there, hadn't seen him in aaaaages, and was super excited. As always, it was a fantastic couple of days of mocking each other, watching ridiculous movies, and going on exciting thrift store hunts. Micheal's prize-find was a couch for his office, super cheap! Mine was a pair raspberry Doc Martins, also for super cheap. We were pleased.
Pleased and hungry.
Now, we ate out once and had pizza another night. But! I also made pumpkin-ginger cupcakes (which I NEED to post on here, they are my most requested cupcakes, and he had informed me from the first time I said I was visiting that I would, in fact, be making them) and Michael made a balsamic roasted red pepper sauce for some chicken.
Holy deliciousness, Batman. I demanded the recipe.
Then, promptly, I altered it. Because that's what you do. He did it too! It's the delicious way.
Seriously, nom. Make lots of variations. It was originally based on a recipe from About.com for Spicy Cornish Hens. I do quite a lot of variation, as you can see. It is spicy, it has some sweetness to it, and it goes deliciously with chicken and/or shrimp. I also like to add couscous as a grain. I prefer them to be whole wheat, but it is up to you.
My Ingredients!
- 10 oz roasted red peppers (I have also done roasted red-and-yellow peppers)
- 3 tablespoons seedless, all-natural, blackberry jam
- 2 teaspoons French mustard
- 1 tablespoon olive oil
- 2/3 teaspoon rosemary
- 2 -3 tablespoons balsamic vinegar
- dash sea salt
- 1/4 teaspoon cayenne (or less or more, depending on how spicy you would prefer)
Put all the ingredients in a food processor/blender/silver-bullet style zoom-machine. Whizz until smooth, taste, and adjust seasonings as you prefer.
On the stove, have a deep skillet and spray a non-fat cooking spray (actual oil would also work...) and cook your protein and/or veg. When partially cooked, pour sauce over it and let finish cooking - the sauce will reduce somewhat.

Enjoy with a glass of wine!
Or any beverage. Or none, but this is a chance to get your eight glasses of water a day.
No joke, this smells and tastes amazing. It has received rave reviews and I can not encourage you enough to try this. Lock it down - it's delicious.
8.1.11
Chicken Fried Pork Chop

BEHOLD.
A fantastic work of choppery.
Less greasy than it looks, sorry, this was fresh from the oil.
Less greasy than it looks, sorry, this was fresh from the oil.
Confession Time: I've never chicken fried anything and, honestly, I'm not sure I'd ever even cooked a pork chop. But it was New Year's and very nice looking, no bone involved, chops were on sale for $1.66! How could I not?
This left me vs pork chops on New Year's Day and, while I knew I wanted a potato/rutabega mashed deliciousness and a peas/mushrooms/red cabbage veggie dish, I didn't know what I wanted to do with the chop. I debated Jamie Olivering my way though it when I found this recipe for Chicken Fried Pork Chops from Rock Recipes (god, I love foodgawker), did some minor tinkering, and dove right in. When I next do this - and there will be a next doing of this - I have some more plans for it, but thought a basic update would be helpful.

Without further ado...
You will need:
- 2 pork chops
- 1/2 cup flour
- 1/2 TSP sea salt
- 1 TSP pepper
- 1/2 TBS nutmeg
- 1 TSP basil
- 1/2 TSP paprika
- dash of cayenne pepper
You'll want to shift all the dry ingredients together in a shallow bowl that is large enough for you to put a pork chop in.
In another bowl, also large enough a chop to be dipped in, you'll want to mix up one egg and 2 TBS water.
Have a frying pan with about a half inch of canola oil in it ready on a medium heat. Not too hot. You don't want like crazy danger zone oil going on here.
Now. Dip your chop in the flour mixture on both sides, then in the egg wash on both sides, and then back in the flour mixture (yes, on all the sides). Fry it in the pan for about 6 minutes on each side, until it is done in the center. You may require a couple more minutes, but I didn't.
Let it rest for a minute so it can cool down and get all...rested.

The final plating.
I killed this. So, so hard.
Celebrate your genius. Devour. Offer a bite to your roommate, if you'd like. Or just make more chops.
2.1.11
Spinach Lasagna. Lock. It. Down.

Oh god, so good. SO. DAMN. GOOD.
This is not the first time I've made my own lasagna, but this was the first time that I had a real, honest-to-god hand-crank pasta maker. (you'll note that I say that as if these are rare and hard to find. although, to be fair, this was a brilliant find at Village Discount. well played, me. and excellent addition.)
Add in a bechamel sauce that is gratifyingly simple and a ragu recipe that I've been tinkering with and, quite frankly, would confidently call "nailed", and then some sweet Italian sausage and Italian cheeses? Blammo. Victory.
Now, none of this is as hard as you think and, technically, you don't really need the pasta maker. But I'd suggest it, if you'd like to make your own pasta more than just once or twice, that you go ahead and get one of these magical items. Even if it isn't from a thrift store, it's not expensive. And as nice as those electric ones are, they don't exactly make large sheets. Get both!
I am not paid by pasta makers.
For the spinach lasagna pasta, I used a recipe from an old Daring Bakers challenge - modified slightly for my needs, but essentially the same. All you need is...
- two jumbo eggs (I needed four large, but I had a lot of spinach involved, last time I used three eggs and it was fine.)
- ten ounces fresh spinach, rinsed and chopped finely
- three and a half cups of flour
Have a large clean surface. I put a large cutting board down on my counter and then heaped the flour there, made a large well in the circle. Add the eggs and the spinach and then mix them together, slowly pulling flour in as you stir. It'll be a rough mess for a while, but after you've got it all mixed in - start kneading and it will come together and be smooth and elastic. Knead for about three minutes. Your aim is to have the dough, when held in a ball in your hands, feel alive.
Wrap the dough in plastic wrap and leave on the counter at room temp for 30 minutes to 3 hours. I suggest going more towards the hours, it gives it more time to do...whatever exactly it's doing in there.
Follow the instructions on your machine how to roll out the pasta - mine you just want to lightly flour a surface and a bit of the dough, then roll it through. Start at either the 1 or 2 setting, then go on down to 5 or 6, depending on how thin you'd like your noodles to be.
Then boil the noodles - in batches of about four at a time - in salted water. You'll want to have them in the water for two minutes if fresh, but for 4 - 6 if dried first. Put them in a bowl of cold water after, then pat them off so they are dry and use in your lasagna dish.

Enjoy!
The sauce! Oh, this sauce. The bechamel is simple.
- 4 TBS butter
- 4 TBS flour
- 2 2/3 cup milk
- salt/pepper
- ground nutmeg, to taste (I used a teaspoon or so)
Melt the butter in a saucepan and sprinkle flour over it, then whisk until smooth and then keep stirring for three minutes. You're forming a delicious little roux. Don't worry, it's easier than you think it is.
Now, pour in the milk, slowly, whisking continually. Bring to a simmer and stir for three or four minutes - the mixture will thicken and you can cook it for another five minutes. Season with salt and pepper and nutmeg (to taste).
Next up, the delicious ragu!
This is easy as well and you can customize it as much as you like. I made a sausage version and vegetarian version, simply by cooking up some Sweet Italian sausage in a different pan and sprinkling it in my meat-version.

This really is a fantastic sauce.
No, really. Do it.
You'll need...
- 1 tin of diced tomato
- 1 small tin of tomato paste
- 1 small onion, diced
- 4 cloves of garlic, diced
- 1 bell pepper, diced
- sliced mushrooms (I probably used about 3/4 cup)
- basil, pepper, salt
- 2 TBS balsamic vinegar
- olive oil
What you want to do...
Splash some oil, basil, onion, and garlic in the bottom of a saucepan and cook for a few minutes, stirring occasionally, until softened. Add in mushrooms and bell pepper, with a touch of butter, and cook for five minutes. Add in the tomato tins (both paste and diced) and stir. Add the balsamic and seasonings, then top with a lid and let simmer and reduce. It took about twenty minutes.
NOW.
On to the delicious assemblage.

This was the vegetarian version and, also, IT IS AMAZING.
No, really.
You'll need all the other ingredients, as well as
- grated Parmesan cheese (one package)
- a meat, if using, cooked and prepared to add with the ragu or use as desired in layers
I drizzled some oil on the bottom of a baking dish, then a layer of the pasta noodles. Spoon a thin layer of the white sauce over the noodles, followed by a thin layer of the red sauce. I then sprinkled some crumbled sausage on the top, but that was my choice - it's still super delicious even without the meat. Vegetarians love it! Then sprinkle cheese on top. Add another layer of noodles and repeat.
When you finish layering, you'll want to sprinkle the top of whole thing with cheese.
Cover the dish with foil and bake for 40 minutes at 375 F. Then remove the foil and cook for another 15 minutes, until the cheese is lightly browned. A knife inserted into the middle will come out hot. Let the dish rest for a few minutes so it settles more and then, slice and dig in.
ULTRA NOM.
10.12.10
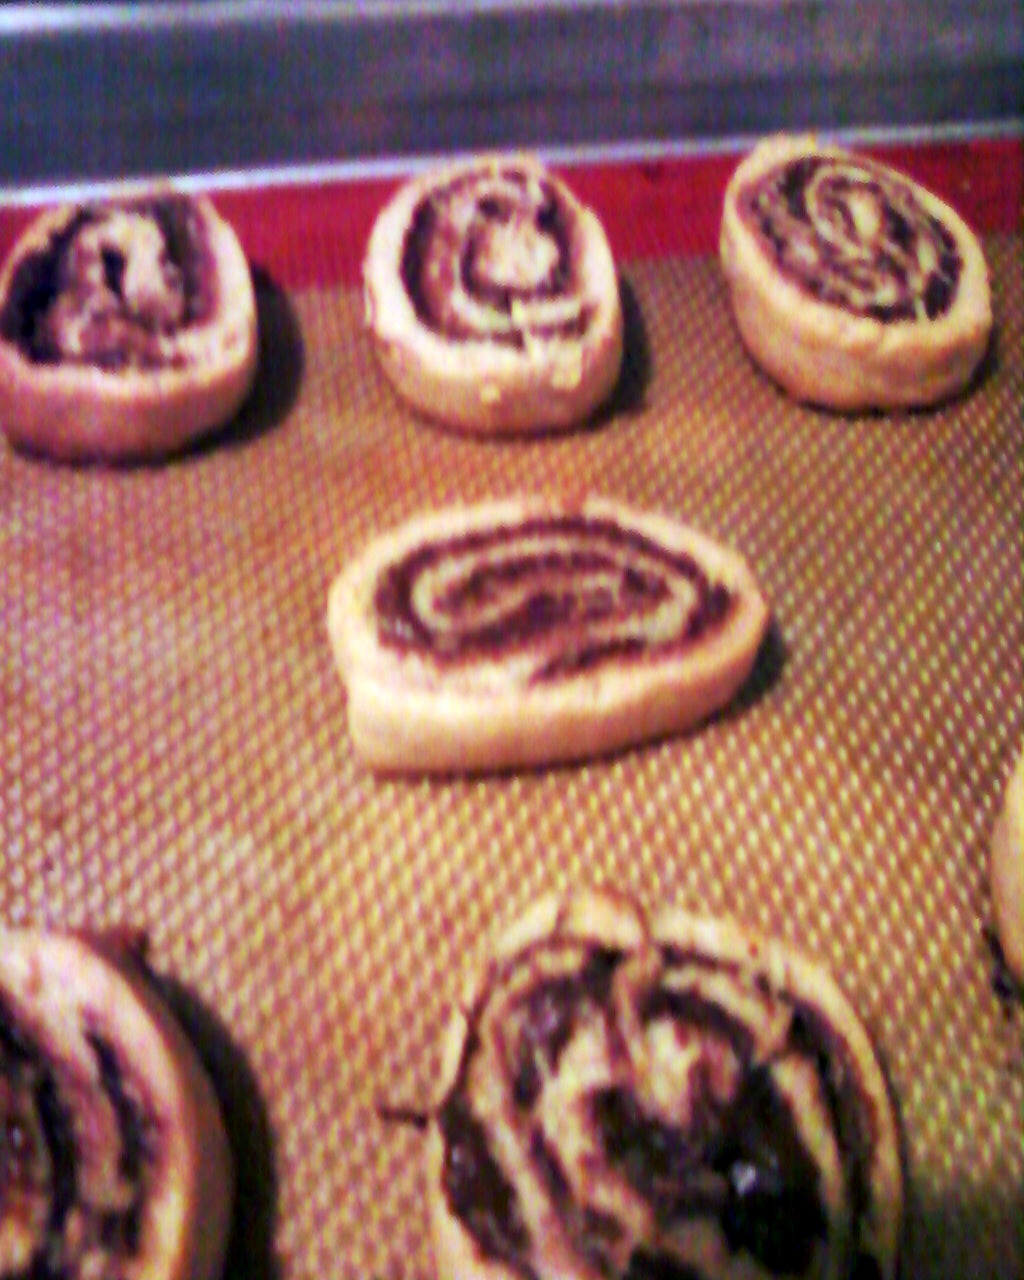
Nutella Pinwheel Cookies

A small bite of awesome. With milk, bein sur.
And yes, those are pink, sparkly nails.
One of the best things about this time of year is that I can bake and bake and bake and nobody is going to say anything about it. Because a) it's hard to complain when your mouth is full of food and b) of course I'm cooking! It's Christimas!
That said, I thought this year I'd occasionally practice some new cookies and such before the massive Bake-a-Thon that heralds the holiday. When I have to go to Target and stock up on those stupid-cute gift bags/boxes/tins, when I burn myself with melted chocolate at least twice, when I have to drink through a failed baking attempt (last year - gingerbread house, year before - a complicated yule log experiment that involved a mousse that involved a packet of gelatin, a first for me, year before before, gingerbread. it melted.) Anyway, I have a handle on gingerbread now. And I do not yet know what baking attempt will blow up in my face at, probably, an ungodly time of night.
Look forward to that post, I'm telling you.
Be glad you don't live with me?
I stumbled across this recipe at The Galley Gourmet and love love loved it. What's not to enjoy? Nutella? Delicious. In cookie form? Fantastic. Super easy? Even better!
This recipe is a good reason to put "rolling pin" on the list of things I want for my kitchen, but I'll get to that and, really, you can find ways around it. Luckily, I was visiting a friend and she had a rolling pin and LO these cookies were whipped up. The recipe is fantastically simple - I halved it to see if I liked it and it worked swimmingly. You might want to make the whole batch though - they go awful fast.
I'm giving the whole recipe, in it's original form, but I used salted butter rather than unsalted and just a pinch of salt additionally and was no worse for wear.
Nutella Pinwheel Cookies
- 8 oz butter
- 1 cup sugar
- 2 egg yolks (I used large, she had extra large, but things seemed fine)
- 2 TSP vanilla
- 2 1/3 cup flour
- 1/4 TSP salt (she calls for kosher)
- 1/2 cup Nutella, divided
Now, I did veer a bit from her instructions, but I'm giving you mine rather than hers. They are virtually identical and if you'd like to mix up the flour/salt before hand and then add later, that's fine. I just didn't bother.
You'll want to cream the butter and sugar together, which doesn't take long and is - as always - delicious because, well, it's butter and sugar. Hard to fail. Add in the egg yolks and the vanilla and then mix up for a minute, until it's combined. Slowly add the flour and salt, until it forms a soft dough.
Transfer the dough to a lightly floured surface and separate into two halves. Form each half into a square, wrap up in plastic wrap, and put it in the fridge for about 30 minutes.
Now. Amuse yourself somehow. We gossiped and watched some Always Sunny in Philadelphia.
Take out one of the squares of dough and place on a lightly floured surface. Have the top covered in the plastic wrap and proceed to roll the dough out into a rectangle about a quarter inch thick. Remove the plastic wrap and spread half of the nutella over it, evenly. Leave about a 1/4 inch on the edges. Roll up the nutella spread cookie dough (god, those are good words to type) into a log and wrap up with plastic wrap (or parchment paper), then pop it into the freezer for about fifteen minutes.
Repeat with the second square of dough.
Preheat the oven to 350 F. You can either butter your cookie sheet, place some baking parchment down on it, place some foil on it, or use a sil-pat. I used a sil-pat. Consequently, I now really want a sil-pat as well as a rolling pin. Go figure.
Go ahead. Eat one already.
You deserve it.
Now. Remove a log of cookie dough from the freezer and unwrap it. Slice into 1/3" slices and place on the baking sheet, an inch or so apart. Bake for 12 to 15 minutes or until the cookies are olden around the edges. Cool on a wire rack and store in an air-tight container for up to a week.
Or eat in one sitting, either way. Delicious!
This recipe will make four dozen cookies, so, share and share alike!
5.12.10
Garlic Basil Foccacia

Toasty brown and deliciously crisp.
Not Jewel's foccacia.
"What are you doing today?"
"Oh, I was thinking of making this foccia."
"Yes. Yes, you were."
A good friend of mine was in town recently and we had this sleepy conversation in the early afternoon hours when I was sprawled (and dressed, go me) in bed and he was freshly awoken. I was musing theoretical about ways to spend my day off and we ended up going to get coffee at a nearby coffee shop I'd not been to, but accurately guessed to be the right place to take him, and spent about a zillion hours at Reckless Records (where I found some cheap VHS tapes we needed, he found some albums he needed, and all in all good times were had) and then braved the rains to get home again. Where I tackled this recipe.
Everyone loved it. Most especially, it seemed, the boys. I was pleased because I'm always proud of a positive yeast-bread experience and this one, even with the corners I ended up cutting (just ten minutes! but they were likely meaningful.) was delicious. I even used some of it to make a grilled sammich and that's pretty much the height of living.
My recipe was taken (and based) from the blog So Tasty, So Yummy - it was splendid! Follow that link for the recipe.
The changes I made were to use canola oil instead of olive (we had more. but it was fine.) and instead of rosemary, I used a generous sprinkling of basil. I also used a Portuguese Salt Cream instead of table salt. It's pretty much like sea salt, it's pretty much outstanding.
I also, although this matters less, did not use a mixer - just the good ol' spoon and hand kneading trick.
I hope you love this bread as much as we did! (the whole thing did not last the evening!)
22.11.10
Cauliflower-Potato Cheese Soup

Soup. Delicious, life-affirming, soup.
Oh it's been up and down and all around, but at any rate, I managed to get into the kitchen and make some soup.
I love soup. Always have. And lately, it's been the only thing I've really been wanting to eat, so I finally got around to making some. I've got my own favorites that I've made, I've got favorites that I want, but this time I went with a whole new soup thanks to (of course) Jamie Oliver. It's his Cauliflower Cheese Soup from Jamie's Food Revolution and ohhhh gracious.
Try. This. Soup.
And not just because any excuse to use an immersion blender is awesome.
It's comforting, it's flavorful, it's actually not really unhealthy because it's made of cauliflower. And it's simple! Insanely so, actually. I adapted it just a pinch, but even with that...well...you'll see. I added some baby potatoes I had, just Russian Blues and a very buttery type.
Ingredients:
- 2 carrots
- 2 celery stalks
- 2 medium onions
- 3 or 4 cloves of garlic
- 5 cups of cauliflower florets
- 3 cups sliced potato (you can sub this with more cauliflower, if you'd like)
- olive oil
- 1 /34 quarts of chicken stock
- sea salt and freshly ground pepper (actually, mine was a Portuguese Salt Cream but that's neither here nor there)
- basil
- 8 oz chedder cheese (grated)
- 1 TSP English mustard
Instructions:
Peel and roughly slice your carrots, onions, and garlic. Slice your celery and cauliflower.
Put a large pot on the stove and add in some olive oil, then add all the chopped and sliced veg and mix together with some basil. Cook for about ten minutes with a lid on, askew, until the carrots/potatoes are softened but holding their shape.

Pour the broth into the pot, then let come to a boil.
Reduce the heat and summer, lid on, for about twelve minutes.
Turn off the heat, season with salt and pepper and then add the cheese and mustard, stir it in a bit and then - using your eager roommate if necessary, use an immersion blender (or in batches in an actual blender, sure) pulse until the soup is smooth.

Thanks, Matt!
You can serve this with bacon, if you'd like, but you can also do what I did and just cook up some chicken with lemon-pepper, slice it, and add to your bowl. Or you can leave it meatless.
Either way, this should serve 6 - 8 and is insanely delicious.
Subscribe to:
Posts (Atom)


